Building The Ultimate Portable Hacking Suite With A Raspberry Pi Zero W

The Raspberry Pi Zero W has made waves all over the world as one of the premier devices for everything wireless.
Whether you need a cheap wifi extender for your home or you want to play retro-games on a budget, this versatile device can do it all, and with the right setup, it will fit in your pocket.
When I set out to build the ultimate portable hacking suite with my Raspberry Pi Zero W, there were a few things that I wanted it be able to do.
Why Would You Build This?
A few months ago I was looking to get rid of my iPhone X and switch back over to Android. I previously had a Samsung Note 5 and loved the functionality.
At the time of purchase, Apple was the only provider that offered a 256GB version of their phone and I jumped on it because I wanted to have all of my music on my phone and quit carrying around a 500GB modified iPod.
In addition to buying the new Note 20 Ultra, I wanted to root it so I could load pentesting software such as Nethunter or Andrax. I wanted to be able to scan local wifi landscapes and have some of the functionality of my Kali distro in my pocket.
But when I started looking at the process of rooting the phone, I decided that I would probably wind up bricking it. Eventually, I tossed the idea of rooting my brand new phone and went searching for an alternative.
This lead me to the Raspberry Pi Zero W. If I could have it powered in my pocket, I could just use Termux or another SSH client from my phone for terminal access. This amazing little single board computer is exactly what I wanted, but it had limitations.
The Build
Building the Pi Zero was not difficult at all, or that expensive. All of initial components were purchased at my local Microcenter, but you can easily buy them on Amazon and have them all shipped at once. I will include my Amazon affiliate links for the build below. The entire build was less than 80 dollars.
Capabilities
There were 3 features that I wanted this build to have.
1.) Captive Portal Capabilities with a Rouge Access Point/Evil Twin
Captive portals and evil twin attacks are staples of phishing campaigns. These attacks aim to trick the target into entering access credentials such as wifi passwords or email account and passwords into a web form.
2.) Wifi Scanning
Wifi scanning requires an additional wifi adapter that can be put into monitor mode. Since the Raspberry Pi Zero W has two microUSB ports, and one is used for power, this was a hurdle that needed to be overcome.
3.) Traditional Pentesting Tools
I wanted to have most of the tools that my Kali distro had and be able to spin up Hydra, GoBuster or SEToolKit on the go.
Power & Housing
The Pi Zero W needed a power source. This was the first problem that needed addressing. There are some solutions out there such as the PiZ Uptime 2.0 or the Pisugar2 Portable but neither of these offered a case.
(I will be doing another post on the PiZ Uptime 2.0 because I think I found a way to make it fit in a standard Pi Zero W case!)
The solution that I found was a small portable battery pack on Amazon that was designed for the Raspberry Pi 3 and Pi Zero W.

As you can see from the picture, there is a microUSB cord built in and a standard USB A cord built into the battery pack. The USB A cord is used to charge the battery and the microUSB cord is used to power the Pi. Even though the size was right, I had to modify the power cord slightly.

I removed the out red rubber from the power cord because it was too thick.
When I plugged the pi into the battery pack, the rubber was impeding the ability to plug another device into the other microUSB port.
Once the rubber was gone from the power cord, it made things a lot easier and I had the millimeters needed to get another adapter into the other microUSB port.
For the case, I used a standard Pi Zero W case, but you could easily switch this out for a different one. To secure the case to the battery pack, I simply used superglue. It keeps it secure really well and bonded nicely to the rubber of the battery pack.
Wifi Dongle & Adapters
The wifi dongle was a very important part of the build because I needed an additional wifi adapter to put into monitor mode for packet injection.

The problem was that I didn’t want to use an OTG cable to connect the dongle to the pi. OTG cables are bulky and it would have run the risk of getting snagged on something my pocket.
I found a microUSB to USB A adapter on eBay that worked really well and was slim enough on the sides to fit with the power cord on the battery pack. I don’t have a link for this, but it’s 2.99 on eBay.
The actual wifi dongle needed to be both Raspberry Pi Zero W compatible and have the ability to go into monitor mode. The wifi dongle that I went with was available at Microcenter, but there are a lot of choices on Amazon.
Most of the TP-Link adapters such as the TL-WN725N will work but you will need to install the r8188eu driver for it. There are a lot of tutorials out there for installing the driver and it’s really easy, but I like the plug and play of the MCM Electronics adapter.

The MCM Electronics adapter uses the rt2800usb driver and works right out of the box.
Note:
One idea I did have was to glue one of the TL-WN722N adapters to the bottom of the battery pack and run an OTG cable to the USB port to the adapter. The thought for this was that there would be better broadcasting because of the antenna.
I abandoned this idea because it would be pretty bulky in my pocket and kind of defeat the purpose of having a portable, pocket sized device. Plus, it would look ridiculous.
Part 1 — Software & Setting Up Captive Portals
Setting up the captive portal on the Pi was a pain. It seemed like no matter what tutorial I tried, I wasn’t getting results. The Pi Zero W has the ability to build a separate interface off of the onboard wireless adapter.
What that means is that you can build a wireless interface such as uap0 and use that as a wifi access point while having internet connectivity off of wlan0. This is super handy because it allows you to have a captive portal on uap0 while still being able to have command and control through SSH on wlan0.
When setting this up, I would either have connectivity on wlan0 but not uap0 or vice versa. So, I turned to a script.
Note:
While there is a Kali distro out there for Pi Zero W, I am using Raspian. What I found was that using Kali’s Network-Manager to control wifi interfaces was a nightmare for getting adapters into monitor mode and maintain command and control through SSH.
I’m sure you could get this working, but I didn’t see much of a benefit other than being able to run Metasploit. Most of the other tools are easily installed in the Pi Zero W.
The script that I used to set up my RougeAP was RPIHotSpot. There is a pretty long setup command, but it works perfectly. Git clone into the repo and then run the setup command.
git clone https://github.com/idev1/rpihotspot.git
./setup-network.sh — install — ap-ssid=”NetworkName” — ap-password=”Password” — ap-country-code=”US” — ap-ip-address=”10.1.1.1" — wifi-interface=”wlan0"
Replace the Network Name and Password as needed, but we can change those in the hostapd.conf file later.
Once the script has completed and the pi has restarted, you will have an access point set up.
You should have several packages installed such as hostapd and a few others. At this point, you should also have connectivity and an IP address on your wlan0 interface.
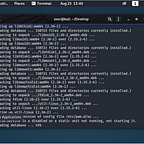
Wlan0 going to be your command and control interface through SSH. From wlan0 you will be able to put wlan1 into monitor mode and control your RougeAP.

As you can see from the screenshot above, both wlan0 and wlan1 have internal IPs. My access point interface, uap0, has a static IP of 10.1.1.1.
At this point, I will install apache2 to the Pi and make sure the service is running.
apt-get install apache2 -y
systemctl enable apache2
If I connect to the access point and browse to the 10.1.1.1 address, I should see an Apache default page.
PiZeroEvilTwin
The PiEvilTwin script is awesome. This is a script by Nick Jongens and offers a pretty barebones version of a captive portal that easily integrated with other custum phishing pages.
Now that we have our access point set up, we need to make some configuration changes to get the captive portal set up. Grab the PiEvilTwin framework through git clone and we’ll get started with integrating it into our RougeAP.
Navigate to hostapd.conf at /etc/hostapd/hostapd.conf. In order for our captive portal to work on targets, we need to make our access point open.

This is a screenshot of my hostapd config file. Notice that I have commented out all of the WPA lines in order to make the access point open. When you do this, you will need to restart the pi for the changes to take effect.
DO NOT INSTALL PiEvilTwin! We are just going to borrow some commands. If you run this it will break your setup.
Open the install.sh file in the PiEvilTwin directory.
cat install.sh

From the screenshot above, you can see that the script will try to copy over various files such as hostapd.conf and dnsmasq.conf. Your hostapd.conf file is already configured so we don’t need that. Here is a list of the commands to run.
apt-get install -y macchanger dnsmasq php -y
cp -Rf html /var/www/
chown -R www-data:www-data /var/www/html
chown root:www-data /var/www/html/.htaccess
cp -f override.conf /etc/apache2/conf-available/
cd /etc/apache2/conf-enabled
ln -s ../conf-available/override.conf override.conf
cd /etc/apache2/mods-enabled
ln -s ../mods-available/rewrite.load rewrite.load
Once these commands have been sent, open PiEvilTwinStart.sh.
cd ../
cat PiEvilTwin.sh

We see from the screenshot above that there are a few changes we need to make in order to get this working with our access point. The biggest is the name of the interface.
Run these commands.
sysctl net.ipv4.ip_forward=1
iptables — flush
iptables -t nat — flush
iptables -t nat -A PREROUTING -i uap0 -p udp -m udp — dport 53 -j DNAT — to-destination 10.1.1.1:53
iptables -t nat -A PREROUTING -i uap0 -p tcp -m tcp — dport 80 -j DNAT — to-destination 10.1.1.1:80
iptables -t nat -A PREROUTING -i uap0 -p tcp -m tcp — dport 443 -j DNAT — to-destination 10.1.1.1:80
iptables -t nat -A POSTROUTING -j MASQUERADE
Now that iptables is configured, let’s open dnsmasq.conf
nano /etc/dnsmasq.conf

This is my dnsmasq.conf file. This is borrowed heavily from the dnsmasq.conf file in the PiEvilTwin directory. Once you have configured your file to match this, we should have a working captive portal.
Reboot your pie and wait for the access point to come up. Make sure that apache and dnsmasq are running.
systemctl start apache2
systemctl start dnsmasq
NOTE: You will need to stop dnsmasq if you want internet access on wlan0. You will not be able to git clone because everything will be resolved to 10.1.1.1.
Time to test your captive portal. On either your phone or a virtual machine, connect to your access point. You should automatically be directed to the index.html page in your /var/www/html directory.
I tested mine on a Ubuntu virtual machine and was automatically prompted but I know this works on iPhone, Mac, Android and with some more configs, Windows.

Here is a screenshot from my Mac.

If you look at the top of the window you will see that my URL is actually http://10.1.1.1/gmail. More on this later.
Now let’s enter an email and password into the fields. I will enter usernametest and passwordtest as mine.
After you enter the username and password, you should be directed to the Loading, please wait… screen. It will never resolve because it’s just text.
Back on the pie. Let’s see if the username and password were captured. We need to go to /var/www/html and cat out usernames.txt. My path will be different on the screenshot.

As you can see, the username and password were successfully captured.
Customizing Captive Portal Phishing Pages
Let’s take a look at the structure of Nick Jongen’s captive portal that he created for Gmail.

Let’s dig into the index.html file.

The most important part of this file is the “action=post.php” code. This code sends the sign-in form credentials to the post.php file. So let’s take a look at that.

From this file, we can see that the credentials will be loaded into “usernames.txt” and that the file will load the loading.html document.
This is important because what we can do is save a website, find the “action=” code in a web form and point it to the post.php file. I’ll explain further with an example.
I went to a popular social media website’s login page and saved it to my computer. There was an index.html file and another folder that contained all of the images from that website.
I transferred the index.html file and the folder to the /var/www/html/ directory of my pi. I used nano to open the index.html file and searched for “action=”. When I found it I changed it to “action=post.php” and saved the index.html file.
I transferred the post.php and loading.html files to the social media folder under /html.
When I browsed to http://10.1.1.1/socialmediasite I was presented with the login. I put in phony creds and was presented with the loading.html text. The texts were captured in my usernames.txt folder.
This is an easy way to make captive portal phishing pages for your engagements.
Changing Captive Portals While On The Go
One of the abilities I wanted for my Pi Zero W was to be able to freely change the captive portals based on the scenario. Should I need to use this in a red team engagement or for a demonstration, I would need different captive portal pages.
I have had a few that were really useful on my WiFi Pineapple, but I wanted to bring this functionality to the Pi Zero W. Utilizing the structure from PiEvilTwin, I created a subfolder under /var/www/html that was entitled gmail.
In the /var/www/html/ directory, you should have a master index.html file. Once you have a bunch of captive portal sites created, you will want to change which captive portal you are using based on different scenarios.
A gmail captive portal won’t really help you if you are trying to phish a corporation on an engagement. To aid in this, we will put a redirect in the index.html file so we can customize which captive portal we want to use easily.
<html>
<head>
<title>Redirecting to Captive Portal</title>
<meta http-equiv=’refresh’ content=’0; url=http://10.1.1.1/gmail'>
</head>
<body>
<p>Please wait, refreshing. If page does not refresh, click <a href=’Sign Into Network’>here</a> to login.</p>
</body>
</html>
This is the redirect that I use to resolve everything to the gmail directory. I would change http://10.1.1.1/gmail to http://10.1.1.1/corporate-phishing-page if I were on an engagement.
This gives you the ability to have a massive phishing library and change the resolving address on the go. Oh…you can also put a BEEF hook in your index.html file to instantly get browser information and possibly browser control.
Just don’t forget to change your access point SSID name in hostapd.conf to blend in.
Part 2 — Setting Up Pentesting Applications
Most pentesting tools that I used on this build worked perfectly. I chose to focus on mass tool distros like fsociety, Red Hawk and Lazy Script because they allowed me to easily install a ton of tools with very little time.
Fsociety
Fsociety offers a lot of tools and you can easily install them with just a tap of your phone.

The information gathering section has the best tools.

Host to IP, Nmap and SeToolKit are probably the most useful while out and about.

The website attack vectors and Wireless Access Point Attack Vector both work well. You can install it here:
git clone https://github.com/Manisso/fsociety.git
Red Hawk
Red Hawk is an all in one vulnerability scanner.

It offers a wide range of scanning options.

As you can see there are SQLi scans and basic recon scripts that you can run. The CMS detection module is pretty great too!
You can get it here.
git clone https://github.com/Tuhinshubhra/RED_HAWK
Lazy Script

Lazy Script is a sysadmin’s dream but also a pentester’s best friend if they are controlling their distro off of Termux. In order to get this running you have to use a monitor the first time you install it. It launches a new window for first time use to complete the install.
After that, all you have to do is set up your alias so you can access the script by just typing “l” into the command prompt.
To set up your alias, you need to open the .bashrc file in your home folder. For me, the command was as follows.
nano /home/pi/.bashrc
Then I scrolled down to the aliases and added my line in.

I saved the file and Lazy Script was up and running on my pi.
Part 3 — Wifi Scanning
Wifi Scanning was the last part of my needs for this project. Since I already had a monitor-mode capable wifi adapter installed as wlan1, all I needed were some scanning scripts.
Wifite

Installing Wifite is essential for easy wins when scanning wifi networks. You can find it below.
git clone https://github.com/derv82/wifite2
Navigate into the wifite2 directory and issue the following command to install the script to your pi.
sudo python setup.py install
This will allow you to run Wifite from anywhere in the terminal. Once installed, you can start scanning on the go through the wlan1 interface.
Airgeddon

Installing Airgeddon is pretty straightforward and is the perfect package for wifi auditing. You can find it below.
You will have to go into the .airgeddonrc file in the directory and change the window to tmux so it works on your phone.

Change this line from xterm to “tmux” and save the file. This allows you use the tool in Termux or another SSH client from your phone.
Final Thoughts
This device took me a while to get together. The concept was something that I knew would take a lot of piecing together. I had to order different components from different sites, but I had a lot of fun putting it together.
Hopefully, this write-up shed some light on how you can turn a Pi Zero W into a very versatile and portable device for pentesting and wifi auditing. There are some things that I would like to add.
The first thing I would like to add would be an external antenna to the internal wifi module. I have seen this mod on a few blogs and would love to drill a hole in the side of the pi case and mount it for futher range of the rouge access point.
Even though the size of the pi and the battery is fairly small. I would love to get this even smaller. Stay tuned to see if I can minimize the PiZ Uptime 2.0 and make it fit inside a standard case!
You can follow me here on Medium or on Twitter @assume_breach