Home Grown Red Team: Installing NetHunter On A Nexus 5 (Like It’s 2013).

I already know what you’re thinking. What year is it? It’s 2023 and the price of a Raspberry Pi is $150 for a top tier model. A Raspberry Pi Zero W 2 is $80. Even the Raspberry Pi 3Bs are expensive. We’re all very sad about it, but…
I bought a Nexus 5 on eBay for $40. It runs a full Kali distro (with some limitations), it can do HID attacks, packet injection for wifi hacking, it has a camera, LTE capabilities, cold boot attacks through DriveDroid, and a built-in monitor.
To me, this is one of the most amazing devices out there for the price. I personally use a OnePlus 7 Pro as my personal phone and it’s preferred if you want an everyday arsenal in your pocket. We’re not going to use our Nexus 5 as a personal phone or a daily driver, just as a red teaming tool.
There are a lot of tutorials out there for this, but the majority of them require you to piece together different files, kernels and other processes. This led me to write this article so we have a good reference to download everything we need and streamline the process of getting our tool configured.
What Are The Limitations?
The most obvious of limitations is the speed. It’s not the fastest phone at almost 10 years old. I haven’t figured out a way to use native packet injection with the onboard wifi module (there might be a way, maybe somebody can help me out).
Downloading The Setup Files
I have put together a DropBox folder that has all of the files we need, minus one. You can download these from the link here:
https://drive.google.com/drive/folders/1IdOI8pyH6hQDuM2PjCFGGlXo4ih78sP5?usp=share_link
Next, we need to download the NetHunter file from Kali.org.
Once all of these files are downloaded, we are ready to go.
NOTE: The fastboot program that I’ve provided will be used on a Mac. You can find the windows equivalent here.
Nexus 5 Setup
The first thing we’re going to do is set up the Nexus with the correct firmware. Boot your Nexus and go to Settings. Scroll down to “About phone” and make sure your Nexus is on Android 6.0.1.
If so, you’re good. If not, we can install the correct version of Android with our script.
Installing Android 6.0.1
Hold the “Power” button and the Volume Down button together until you come to the bootloader menu.

Plug your Nexus into your computer.
Open a terminal on your Mac (Powershell on Windows) and navigate to the Nexus 5 folder and go into hammerhead folder. Run this command.
bash flash-all.sh

You’ll get this error but it’s okay. Press the Power button and your phone should automatically reboot into the Android setup process. This will take a while.
Enable Developer Options
This is a fairly straightforward process.
Go to “Settings” and then scroll down to “About Phone.” Scroll down to the “Build number” and tap it enough times to enable Developer mode.
Go back to “Settings” and scroll down to “Developer options.” Enable “USB Debugging.”
If you’re on a Mac, you’ll need the Android File Transfer program. You can download it here.
If you’re on a Windows machine you might not need the Windows equivalent as the phone might just pop up in your File Explorer.
Installing TWRP Recovery
Power down your phone. Now hold the Power and Vol Down buttons together to boot back into the bootloader.
Once in the bootloader, go back to your terminal and run this command.
./fastboot flash recovery twrp-3.7.0_9–0-hammerheadcaf.img
TWRP will install and we’ll see it in the terminal.

Now on your phone use the Volume buttons to scroll to “Recovery Mode” and then press the Power button.
The phone will reboot into TWRP. Your phone’s file structure should open in Android File Transfer.

Transfer Files To The Phone
We need to transfer these 3 files to the phone. I like to put them in the “Downloads” folder.

Installing The Nethunter Kernel
There are two Kali files here. One of these files contains the right custom kernel. However, when I tried to build the chroot, it never built. The other file contains the right Kali files, but no custom kernel. So we’ll flash the kernel first.
Resizing /System
Most of the time, you’ll get an error that your /system folder isn’t big enough for Kali. So what we need to do is resize it.
In TWRP we go to “Wipe” > “Advanced” and then put a check mark next to System. Click on the “Repair” option at the bottom. Then click on the “Resize” option in the next menu.
Now go to “Install” on TWRP and then go to the “Downloads.” The first Kali file we are going to install is the hammerhead-marshmallow-kalifs-full.zip. This one has the kernel.
It will take a while to install.
Once it has finished, we need to install the SR5-Super-SU file. This will give us root.
When that has installed we click “Reboot System” and the phone will boot into Android. At this point, you should see the Nethunter graphic on boot and your phone’s wallpaper will be changed to the Nethunter wallpaper.
When you go to the applications menu you should see the Nethunter apps.

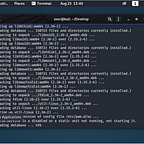
Checking The Kernel
We open the Nethunter app and and approve all of the prompts, including giving the app root permissions. Afterward, we should see that our kernel has installed.

It’s a bad picture, but we see that we have the Re4son kernel, BusyBox is installed and we have HID interfaces. This is great!
Installing Kali Distro Programs
If we tried to build the kalifs files right now, it would download but not install. So what we need to do is reboot back into TWRP.
Back in TWRP, we install the nethunter-2020.3-hammerhead-nougat-kalifs-full.zip file.
This will remove the previous chroot from the phone while keeping the custom kernel. The install will take a little while.
When the install completes, we need to reinstall the SuperSU zip file to get root back.
Then we can reboot the phone into our Android system.
Updating The System
With everything installed correctly, we need to update the Apps and the system. We can open the Nethunter Store app and we’ll see that Nethunter and the Nethunter Terminal need to be updated.

DO NOT UPDATE NETHUNTER!!!!
Only update Nethunter Terminal. If you update NetHunter you will run into terminal problems.
Now we can open the Nethunter app and click on “Kali Chroot Manager”. Click on “Start Kali Chroot” and everything should start up.

Go back to the main menu in Nethunter and click on Kali Services. Turn on SSH.

Now open the NetHunter Terminal and run ifconfig to get the IP for the phone. You will also need to change the root password with passwd.
And now you should be able to ssh into your phone with a terminal.

We can run MetaSploit.

We can turn on monitor mode for wlan1 in the Kali custom commands and run Wifite with an external card.

At this point, we are good to go. At the time of testing, I have discovered that updating packages breaks the install with package dependency problems.
This goes beyond the scope of the article so if you want to mess around with that you can.
Here’s the fix for the GPG error you’ll get when updating. After that, good luck.
gpg --keyserver pgpkeys.mit.edu --recv-key  ED444FF07D8D0BF6
gpg -a --export ED444FF07D8D0BF6 | sudo apt-key add -
Custom Commands
What I love about Nethunter is the custom commands option. It comes with a few like putting wlan1 into monitor mode and running Wifite, but you can add your own.
For the HID attacks, we need to add a custom command to run on startup.
We’ll go to the Kali Custom Commands menu and click “Add.”
We can label it “Enable HID Win”. The command is below.
su -c setprop sys.usb.config win,mtp,hid,adb;exit
We’ll set it send to android and initiate it to RunOnBoot.
Now we can go into the Nethunter Store and install Rucky. It’s probably the easiest HID/RubberDucky app. You’ll have to give it root privileges and you might have to reboot your Nexus to keep it from crashing the first time.
You might also have to manually apply root privs to Rucky in SuperSU.
Once it’s up, we can just type or upload ducky scripts to it.

Hit the “Play” button and your script will run on the target.

What Else?
There are a million things you can do with this. Pop a SIM card into your Nexus 5 and add a microUSB to Ethernet adapter. Now you have a network implant that you can ssh to from anywhere.

The possibilities are endless. Something that inspired this was the famous evil clipboard where somebody puts a ProxMark inside with a Raspberry Pi and a bluetooth keyboard and is able to clone RFID badges.
The Nexus 5 is able to run ProxMark software so I will be working on a similar project.
What About Kex And A Graphical Desktop?
In my opinion, the Nexus 5 is not powerful enough to reliably run the graphical portion of Nethunter. I have run it on my OnePlus 7 Pro and it works great, but I wouldn’t run it on a Nexus 5 with 2GB of RAM.
Wrapping Up
The Nexus 5 is probably one of the coolest devices out there for running a mobile hacking suite. It’s small, light and inconspicuous. It has a massive toolset with the ability to run HID attacks, WiFi packet injection, Bluetooth attacks and a suite of other Kali tools such as MetaSploit.
For 40 bucks, you just can’t go wrong. It’s a little quirkier than a Raspberry Pi, but it also has an onboard monitor so you can see what you’re doing and switch between tools pretty quickly.
There are a lot of other features that I didn’t cover with Nethunter such as Karma wireless attacks, an onboard Social Engineering Toolkit, MiTM Framework and a lot more.
Stay tuned for more builds, hacks and other tutorials. You can follow me on here or on Twitter @assume_breach